
The world of Google Analytics, for many, can be an overwhelming place. Certainly enlightening, but with all that visitor data, it can be difficult to identify the metrics that really count. Getting your head around standard reporting is the logical place to start, but it just isn’t as useful as analysing specific user groups and visitor types.
Advanced segments allow you to isolate users or visits that match a specific criteria, and custom segments can be used to segment by audience demographic (age, gender, interests), technology, behaviour, date of first visit and traffic source. Once saved, custom segments can be shared with other users and applied across multiple Analytics accounts – the gallery boasts a collection of useful segments created by other Google Analytics users and members of the Google Analytics team.
For First-Time Segment-ers
Applying an advanced segment
Applying an advanced segment is as simple as selecting the “All Users” tab in Google Analytics and scrolling through the list until you find what you’re looking for:

Image 1 – Getting Started
Creating a custom segment
It’s hard to miss that big red button in the screenshot above. Click “+NEW SEGMENT”, name it and choose from the five/six segment types:

Image 2 – Create Custom Segment
As you can see, Demographics allows us to segment users by age, gender, language, affinity category, and location so long you’ve enabled Advertising Features. The Technology options are based on the web and mobile technologies used to visit the site such as OS (operating system), browser and device. Behaviour allows users to be segmented by number of visits, the number of days since their last visit, and visit duration and Date of First Session lets us segment users according to when they first visited the site.Traffic Sources segments users by their method for finding the site – organic search, paid, direct etc. If you’re using campaigns, you can isolate data according to the UTM parameters you used in your urls.
The sixth segment type, Enhanced E-commerce, will only appear when enhanced ecommerce is enabled. It allows you to isolate users based on the products they purchased or on the revenue they’ve generated based on a purchase.
Under Advanced we can add up to 20 and/or Conditions to create a custom segment, or segment users according to a sequence of events:
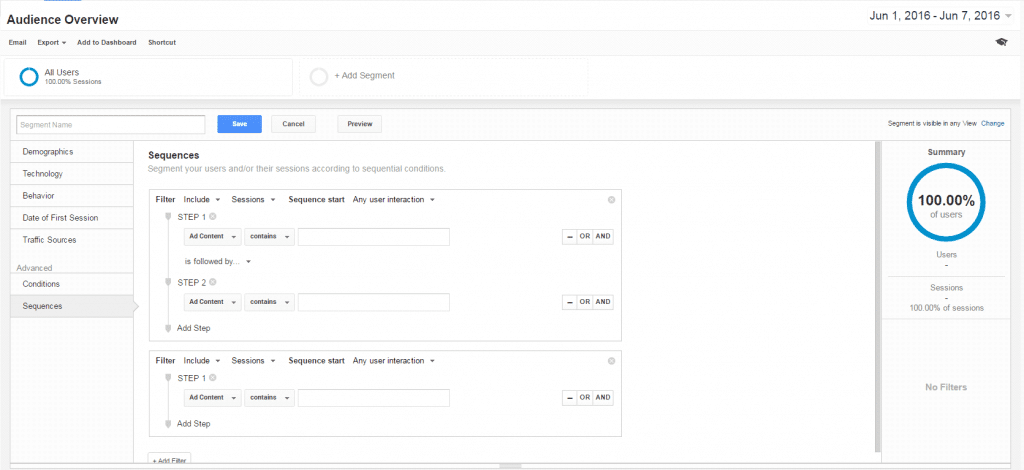
Image 3 – Create Custom Segment (advanced)
When you’re done setting up your custom segment, you can test and preview it to make sure it works, then save it and share it. You can go back and edit it any time by clicking the downward chevron in the top corner of the segment tab.
Practical examples for applying advanced segments
Advanced segments for eCommerce sites
Scenario One: Your business offers international shipping, so you’re interested to find the conversion rate of your international visitors.
You can use Demographics and choose from the Location drop down to view the continent, sub continent, country, region or city in which your users reside. You can isolate those visitors, analyse their visit and apply the purchase funnel. Maybe you see a big drop-off in that funnel when those users get to the checkout and are presented with shipping fees. Are they too high? Are delivery options inflexible? Are you forcing users to create an account in order to purchase?
Scenario Two: You’ve hired a new copywriter and you want to see if their new blogging activities are affecting purchases.
Under Enhanced E-commerce, select Purchased an item. Depending on your product, it may be pertinent to set some revenue parameters per user. Then set up a condition under the Advanced options and filter users by the Landing Page to find out if they arrived at the site via a blog post before going on to make a purchase. If you’re happy with the figure, it might be time to give that new copywriter a pat on the back. Scrutinise those posts that worked particularly well – how were they promoted? Was the tone particularly persuasive? Did you include images? Video?
Advanced Segments for Lead Gen sites
Scenario One: You’re coming to the end of the first week of a month-long promotion and you want to review how the social media activity around the promotion has affected website traffic so far.
Based on the UTM data you entered when building your campaign initially, click the Traffic Sources option and complete the Campaign, Medium and Source fields to reveal granular data, say, from Facebook for your “June Madness” promotion. Should you wish to see how the campaign is performing as a whole, simply leave the Medium and Source fields blank.
Scenario Two: You’re curious to know how many times a user visits your site before they convert.
Your best bet is to set up three separate segments: The first to understand the proportion of users converting on the first visit; the next to see the proportion that convert on the second visit; and the third to find out how many users are visiting three times or more before converting.
You’ll need to segment your users’ sessions according to single or multi-session conditions, and so under Advanced > Conditions include sessions filtered by Goal Completions (or select the goal number for contact form completions if you’ve got more than one goal set up… and you likely have) and set the value to greater than 0. Next, add an and condition and set your Count of Sessions to equals one. Repeat this process to create a segment for those converting on the second visit, ensuring Count of Sessions equals two. To segment those who converted on the third visit or more, select greater than two for the Count of Sessions.
Practice makes perfect
If you’re tackling advanced segments for the first time, all this can seem a little daunting. The good news is that the more you create, amend and tweak your advanced segments, the more tailored and therefore useful they’ll become. Segments can be edited at any time, and so if you create and apply a custom segment, and things don’t add up, simply retrace your steps until you see where you went wrong. They don’t strip out data like a filtered GA profile, so you’ll not lose anything by rejigging your criteria.
Segmenting website traffic you deem important will help reveal potential areas of weakness on your site. The better you understand your site’s weaknesses, the better chance you have of working to improve them.